2
Software Developer Career Path
In this tutorial you will get to know different types of companies in software industry, software developer career progression.
In our last tutorial, we discussed the basics of html tags. We tried to understand basic tags like html, head, and body, and we also looked at a couple of body tags like p, h1,h2,h3,h4,h5,h6 tags, and we discussed in depth the head tags like title, script, style, link, noscript, meta, base, and so on.
Let's continue with body tags in this tutorial.
If you remember, in our roadmap tutorial, we decided to use 'react' to understand HTML, CSS, and Javascript because our final goal is 'react' itself.
If you don't want to do all these things in the React project, all concepts will remain the same, so you can use the HTML project folder that we created in our previous tutorial.
So, let's continue to create a new ‘react project’.
Step 1: Create a folder on your computer anywhere you prefer; I will give the name 'learningReact’ (your choice).
Step 2: Open Visual Studio code, do File>Open, and select the folder that you created in Step 1. This opens our folder in VS Code; for now, it will be empty as we do not have files.
Step 3: Let's open the terminal. Do Terminal>New Terminal. A terminal will open in the bottom part of your Visual Studio code.
Step 4: Type the following command in the terminal and press enter.
npx create-react-app learning
Here ‘learning’ is the project name; it's your choice which name you want to give. This command gets succeeded only when you have ‘node js’ in your computer. If you remember, we installed node js in our previous tutorials. If you have not yet installed it, feel free to refer to my previous tutorials.
Step 5: Now the project has been created by the name ‘learning’. Lets run the command ‘npm start’ inside this ‘learning’ folder.
To do that I will go into this folder using the command ‘cd learning’ in the terminal. Now we can run ‘npm start’ to start running the react project which we created.
Now the project is running on a specific port, you can find details in the terminal, my project is running on ‘http://localhost:3000’.
Step 6: Open this url in the browser to see our web application. You can observe the default react page in the browser.
We are done with the project setup and able to run the project.
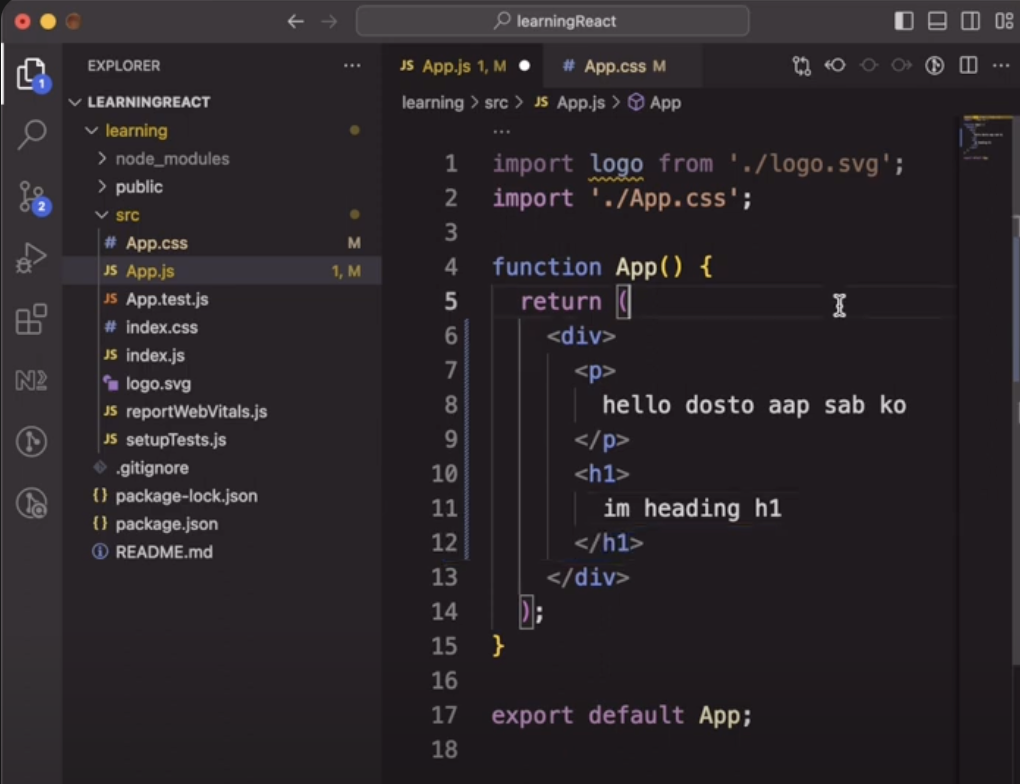
Now let's open the App.js file present inside the learning>src folder. Lets cleanup the file, it will look like this

Save this using ‘ctrl+s’ (press ctrl and s at a time without plus symbol). Now open the browser and check there is a blank screen.

In the same way we can open App.css and delete the existing code. Now it will look like this

Whatever tags we want to write inside the ‘body’ tag of HTML, those we will write inside ‘App.js’, we write styles inside ‘App.css’. Why do we do that? We will get to know about this once we understand react in our future tutorial.
Let's start with the ‘p’ tag, if you remember p tag is the paragraph tag used for showing text on the screen. Let's write some dummy text inside the ‘p’ tag.

Save it using ‘ctrl+s’ and you can check the output which looks like this

Same way let's write h1 tag and write some dummy text in it.
Let's apply styles by opening app.css file and apply styles as follows

On the right side I'm showing its output on the browser.
We saw all these in our previous tutorial where we implemented this in an html project.
img Tag:
If we want to show any image on screen then we use img tag.
To demonstrate this we can download any image from google and place it inside our project , learning>public folder.
<img src=”path” alt=”text-to-appear-when-image-doenst-show” />
Here ‘src’ is the ‘source’, we need to give the path where our image resides, it can be Url or local image. ‘alt’ attribute is general text, this text will appear on screen when the image doesn't render(show) for any reason(like incorrect path, etc).

The css file will look like this

div Tag:
The div tag is the ‘container’ tag; it helps us group different tags and apply styles as required. For example, if we want to group a few elements, say an image, text, etc., and want to make them align horizontally or vertically, we can take a div tag and do it accordingly.
<div>
<p> hello friends </p>
<img src=”mypic.jpg” alt=”myphoto” />
</div>
Here you can observe that the div tag has grouped two tags, i.e., the p tag and the img tag. If we apply background colour to the div tag, then it gets applied to both as a background.
We will use a lot of it in future tutorials; you will get to understand it sooner.
Css Selectors:
Till now we have applied style to type(i.e p, img, div, etc), for example if you can check below css styles, color blue is applied to ‘p’ element i.e ‘Hello friends’ will be blue.
Css:
p{
color: blue
}
html:
<p>
Hello friends
</p>
What if we have more than one ‘p’ type element in our code? Yes, the same style gets applied to both the ‘p’ tags. So both ‘Hello friends’ and ‘Im another text’ applied with the color blue. This way of writing styles prevents us from applying styles to specific elements. That’s where we need ‘CSS Selectors’.
<p>
Hello friends
</p>
<p>
Im another text
</p>
Types of ‘Css Selectors’:
These are the most frequently used selectors in CSS, which help us apply styles to elements.
1.Type Selector:
The type selector helps to apply styles to a specific tag or element; for example, if we want to apply styles to all ‘p’ tags, then we can use the type selector. Till now whatever we used they are ‘type selector’.
p{
color: blue
}
div{
background-color: orange
}
We used ‘type selector’ here, the color blue will be applied to all the ‘p’ type elements, the same way, background color orange will be applied to all the div type elements.
We usually don't use this unless we need to apply styles globally to all the similar elements.
2.Class Selector:
If we want to apply style to a specific element then we can use ‘Class Selector’. We use ‘className’ attribute at the html end, and we use .(dot) for selecting that class to apply style.
Css:
.somename{
color: blue
}
.container{
background-color: orange
}
Html:
<div className=”container”>
<p className=”somename”>
Hello friends
</p>
</div>
Here you can observe we wrote style starting with dot(.), this style gets applied to the ‘p’ element which has the same className(”somename”). Same way, we applied background color orange to the div element using class selector.
We can use the same className to different tags/elements.
Css:
.somename{
color: blue
}
Html:
<p className=”somename”>
Hello friends
</p>
<span className=”somename”>
You are crazy.
</span>
We use this type of selector when we want to apply styles to different elements but not globally.
3.ID Selector:
If we want to apply style to only one element specifically then we use ID Selector. We use the ‘id’ attribute at the html end, and we use #(hash/pound) for selecting that id to apply style.
Css:
#somename{
color: blue
}
#container{
background-color: orange
}
Html:
<div id=”container”>
<p id=”somename”>
Hello friends
</p>
</div>
Here you can observe we wrote a style starting with #, this style gets applied to the ‘p’ element which has the same id(”somename”). Same way, we applied background color orange to the div element using id selector.
We cannot use the same id to different tags/elements.
<p id=”general”> welcome to earth </p>
<p id=”general”> always try to win</p>
This is ‘invalid’.
Wherever we want to apply styles exclusively to a element then we use id selector
If we want to apply styles to a pseudo element then we use ‘Pseudo Selector’. Pseudo selector can be applied in combination with any of the above selectors i.e type selector, class selector or id selector.
Let's understand this with one example.

In this ‘css’ file you can observe : (colon) symbol after .abc class selector. The pseudo element name is ‘hover’ .
‘Hover’ indicates whenever we move our mouse onto that element(here abc) then this specific style gets applied i.e color pink will be applied. If we don't hover on the element then default style gets applied i.e orange color gets applied.
Here we used class selector to apply pseudo styles but we can also use id selector i.e
#abc:hover{
color: pink
}
This helps if we want to highlight a certain area/button when a mouse pointer is placed on it.
Here ‘hover’ just one of the example, there are many pseudo elements we have in html, like ‘active’, ‘before’, ‘after’, ‘first-line’, etc
 HTML Head Tags like title, script, style, link, noscript, meta tags explanationHTML Head Tags like title, script, style, link, noscript, meta tags explanation